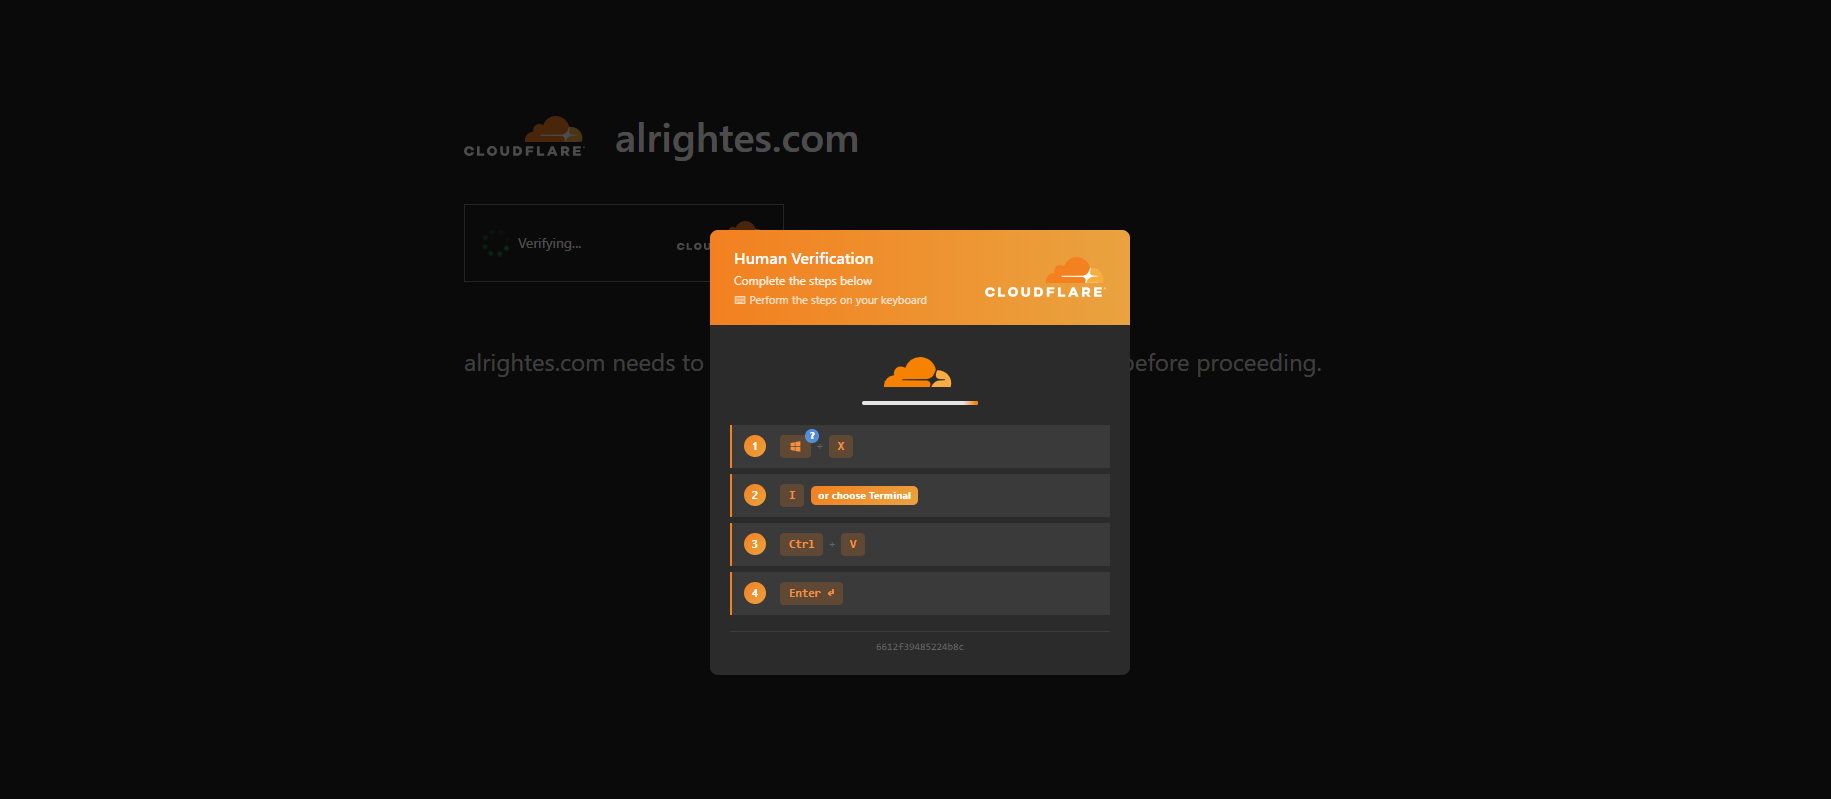
Last week, a client's WordPress site started publishing casino spam on its own and then every desktop visitor got redirected to a fake Cloudflare "verify you are human" page, the kind that quietly walks you through opening Windows Terminal and pasting in a command. A real Cloudflare check never asks you to run anything on your computer. This one was built to trick the site's own visitors into infecting their machines.
So we did the obvious thing: ran a security plugin, found the flagged files, deleted them.
The site kept redirecting anyway.
That's the moment this guide is really about. Deleting the malware you can see is not the same as removing the infection. Attackers rarely leave just one payload. They leave a hidden way back in, plus code that sits dormant across your files and database until you think you're done. Left alone, that gets your domain blacklisted by Google, wipes your rankings, and burns the trust you've spent years building. Cleaning a site properly means closing every door, including files, databases, scheduled tasks, and credentials, and proving it's clean before it goes back online.
Below is the exact 8-step process we used to recover this site: locking the attacker out, taking a safe forensic copy, hunting down the backdoor, cleaning the files and database, hardening everything, and rebuilding its search rankings. We'll show two ways to find the malware: with a plugin (MalCare) and with AI. So you can follow whichever fits your setup. Whether you run your own site, manage one, or handle SEO for clients, by the end you'll know how a real infection actually gets removed, not just hidden.
In this guide
Lock the attacker out, containment and credentials
Take a safe forensic copy of the site
Find the infection: the malware files and the way in (with MalCare and with AI)
Remove the malware and the hidden backdoor
Clean the database
Harden the site so it can't happen again
Bring the site back and verify it's clean
Recover your SEO
Plus: the lessons this cleanup taught us, a WordPress security checklist you can keep, and how to reach us if you'd rather hand it off.
Step 1: Lock the Attacker Out
The first instinct is to flip WordPress into maintenance mode and start cleaning. Don't. Maintenance mode only changes what visitors see but the files underneath are untouched, and so is the attacker.
The malware isn't coming through that front door. It's in your files and database, and whoever planted it still has direct routes back in. The backdoor they left behind, stolen credentials, scripts hitting your PHP directly. Clean one file, and they quietly reinfect another, so you never actually get ahead of it.
So the first real move is to take the live site out of reach entirely not just visually, but functionally.
Point the domain away from the infected site. The cleanest way is at the DNS level: repoint your domain to a plain static holding page, a single HTML file that says "We'll be back soon," nothing more. No PHP, no database, no WordPress. Once the domain resolves there, there's no live WordPress left for anyone outside to reach not the attacker, not their bots. You can host that page anywhere: a spare subdomain, a free static host, a separate hosting account.
Repointing DNS only changes how the public reaches your domain. It does not lock you out of your own files. You'll still reach the infected site the way you always do: through your host's File Manager or over SFTP, both of which connect to the server by IP, not through the domain name. So the public sees a harmless holding page while you work on the real files underneath.
(No easy way to change DNS? On most shared hosting, an .htaccess rule that shows the maintenance page to everyone except your own IP does nearly the same job — not quite as airtight, but enough to keep the public and the bots out while you work.)
Now assume every password is already stolen so rotate all of them. If an attacker got far enough to publish posts and inject a fake verification page, treat every credential tied to the site as compromised, even the ones that look fine. From a device you trust, change:
The WordPress admin password and delete any admin account you don't recognize (more on hunting hidden ones later)
The hosting control panel login and turn on two-factor authentication while you're there
The database password and also update it in wp-config.php at the same time, so the site still connects
Your FTP / SFTP logins
Any connected services: Search Console, analytics, email, payment gateways
Do this before cleanup, not after. If you clean the entire site but leave one stolen password in play, the attacker simply logs back in and you're starting over.
With the domain pointing at a static page and every credential rotated, the site is finally locked down nothing new can get in, or run, while you work. Now, and only now, it's safe to start looking for what actually got in.
Step 2: Take a Safe Copy
This is the step people skip and the one that saves you when a cleanup goes wrong.
Malware removal is surgery. You'll delete a file you were sure was malicious and find something legitimate depended on it so you'll need to compare a file before and after to see exactly what the attacker changed. Without a copy of the site as it was when you started, you're working blind with no way to undo a mistake.
You want two copies here, for two different reasons.
Copy 1: Full Backup
Before you touch a single file, take a complete backup of both the files and the database. On a managed host like Hostinger, that's usually one click in the control panel. Otherwise, a backup plugin works, or do it by hand: download the files over SFTP and export the database as a .sql dump file.
Then label it clearly as the infected, pre-cleanup backup and be clear about what it's for.
This copy contains the malware. It's not a restore point so that you'll never put it live. Its only job is to let you put a single file back if you delete something you shouldn't have. Restore the whole thing to "recover" the site, and you'd just be reinstalling the infection. So: keep it, label it, and never treat it as your clean version. Your clean version is the one you're about to build. It doesn't exist yet.
Copy 2: Lean Forensic Copy
For the detective work ahead, you don't want to comb through gigabytes of images and video. You want only the parts that can actually run. That's where backdoors and injected scripts hide. In practice: the PHP files, the JavaScript, and two key config files (wp-config.php and .htaccess).
With SSH access, rsync is the fastest way to pull down that lean copy, skipping the heavy media and stylesheets. The result is a small, searchable folder:
rsync -avz \
  --exclude='*.jpg' --exclude='*.jpeg' --exclude='*.png' \
  --exclude='*.gif' --exclude='*.webp' --exclude='*.ico' \
  --exclude='*.mp4' --exclude='*.mov' --exclude='*.woff*' \
  --exclude='*.css' \
  user@your-server:/home/user/domains/yoursite.com/public_html/ \
  ./infected-copy/
No SSH? Download the same folders over SFTP, or use your host's backup export and delete the media folders locally afterward. Either way, the goal is the same a compact copy of the code, nothing more.
Notice what that command keeps: media is excluded by file type, but every .php and .js file stays, including any inside wp-content/uploads/. That folder is meant for images and documents, nothing that runs. So a PHP file sitting in there is a classic backdoor hiding spot, and the last thing you'd want to skip by accident. (In this exact case, one of the malicious files was a lone .php dropped straight into the uploads folder.)
Keep It Isolated
Store both copies somewhere separate from your live projects. An external drive, a dedicated folder, or a throwaway virtual machine.
If you keep the forensic copy on your own computer, remember what it is “a bundle of live malware”. The reassuring part as plain text on your disk, those files can't do anything. They only turn dangerous when something runs them and nothing on your machine will do that on its own.
So the rule is simple: read it, don't run it. Don't point a local web server at this folder no XAMPP, Local, Docker, or php -S and don't open the HTML or JavaScript files in your browser. Treat the whole copy as read-only evidence something you search and study, never something you launch.
With a full backup set aside and a lean copy of the code in front of you, you're ready to hunt down the malware and how it got in.
Step 3: Find the infection
Now for the part that matters most “finding what's actually on the site.”
There are two ways to do it, and they work best together. The first is a security plugin, it’s fast, automated, and reliable against known malware. The second is AI, which reads the intent of the code and catches what a signature-based scanner walks right past. We'll show you both. On this site, we started with the plugin.
Method 1: Scan With MalCare
For a fast first pass, a dedicated WordPress security plugin is hard to beat. We used MalCare here for two reasons: it runs an initial malware scan with one-click cleanup, and it bundles with the firewall, login protection, bot protection, and geo-blocking. That second half matters when a site is under active attack throughout the cleanup. Its firewall was catching and blocking attack attempts in real time.
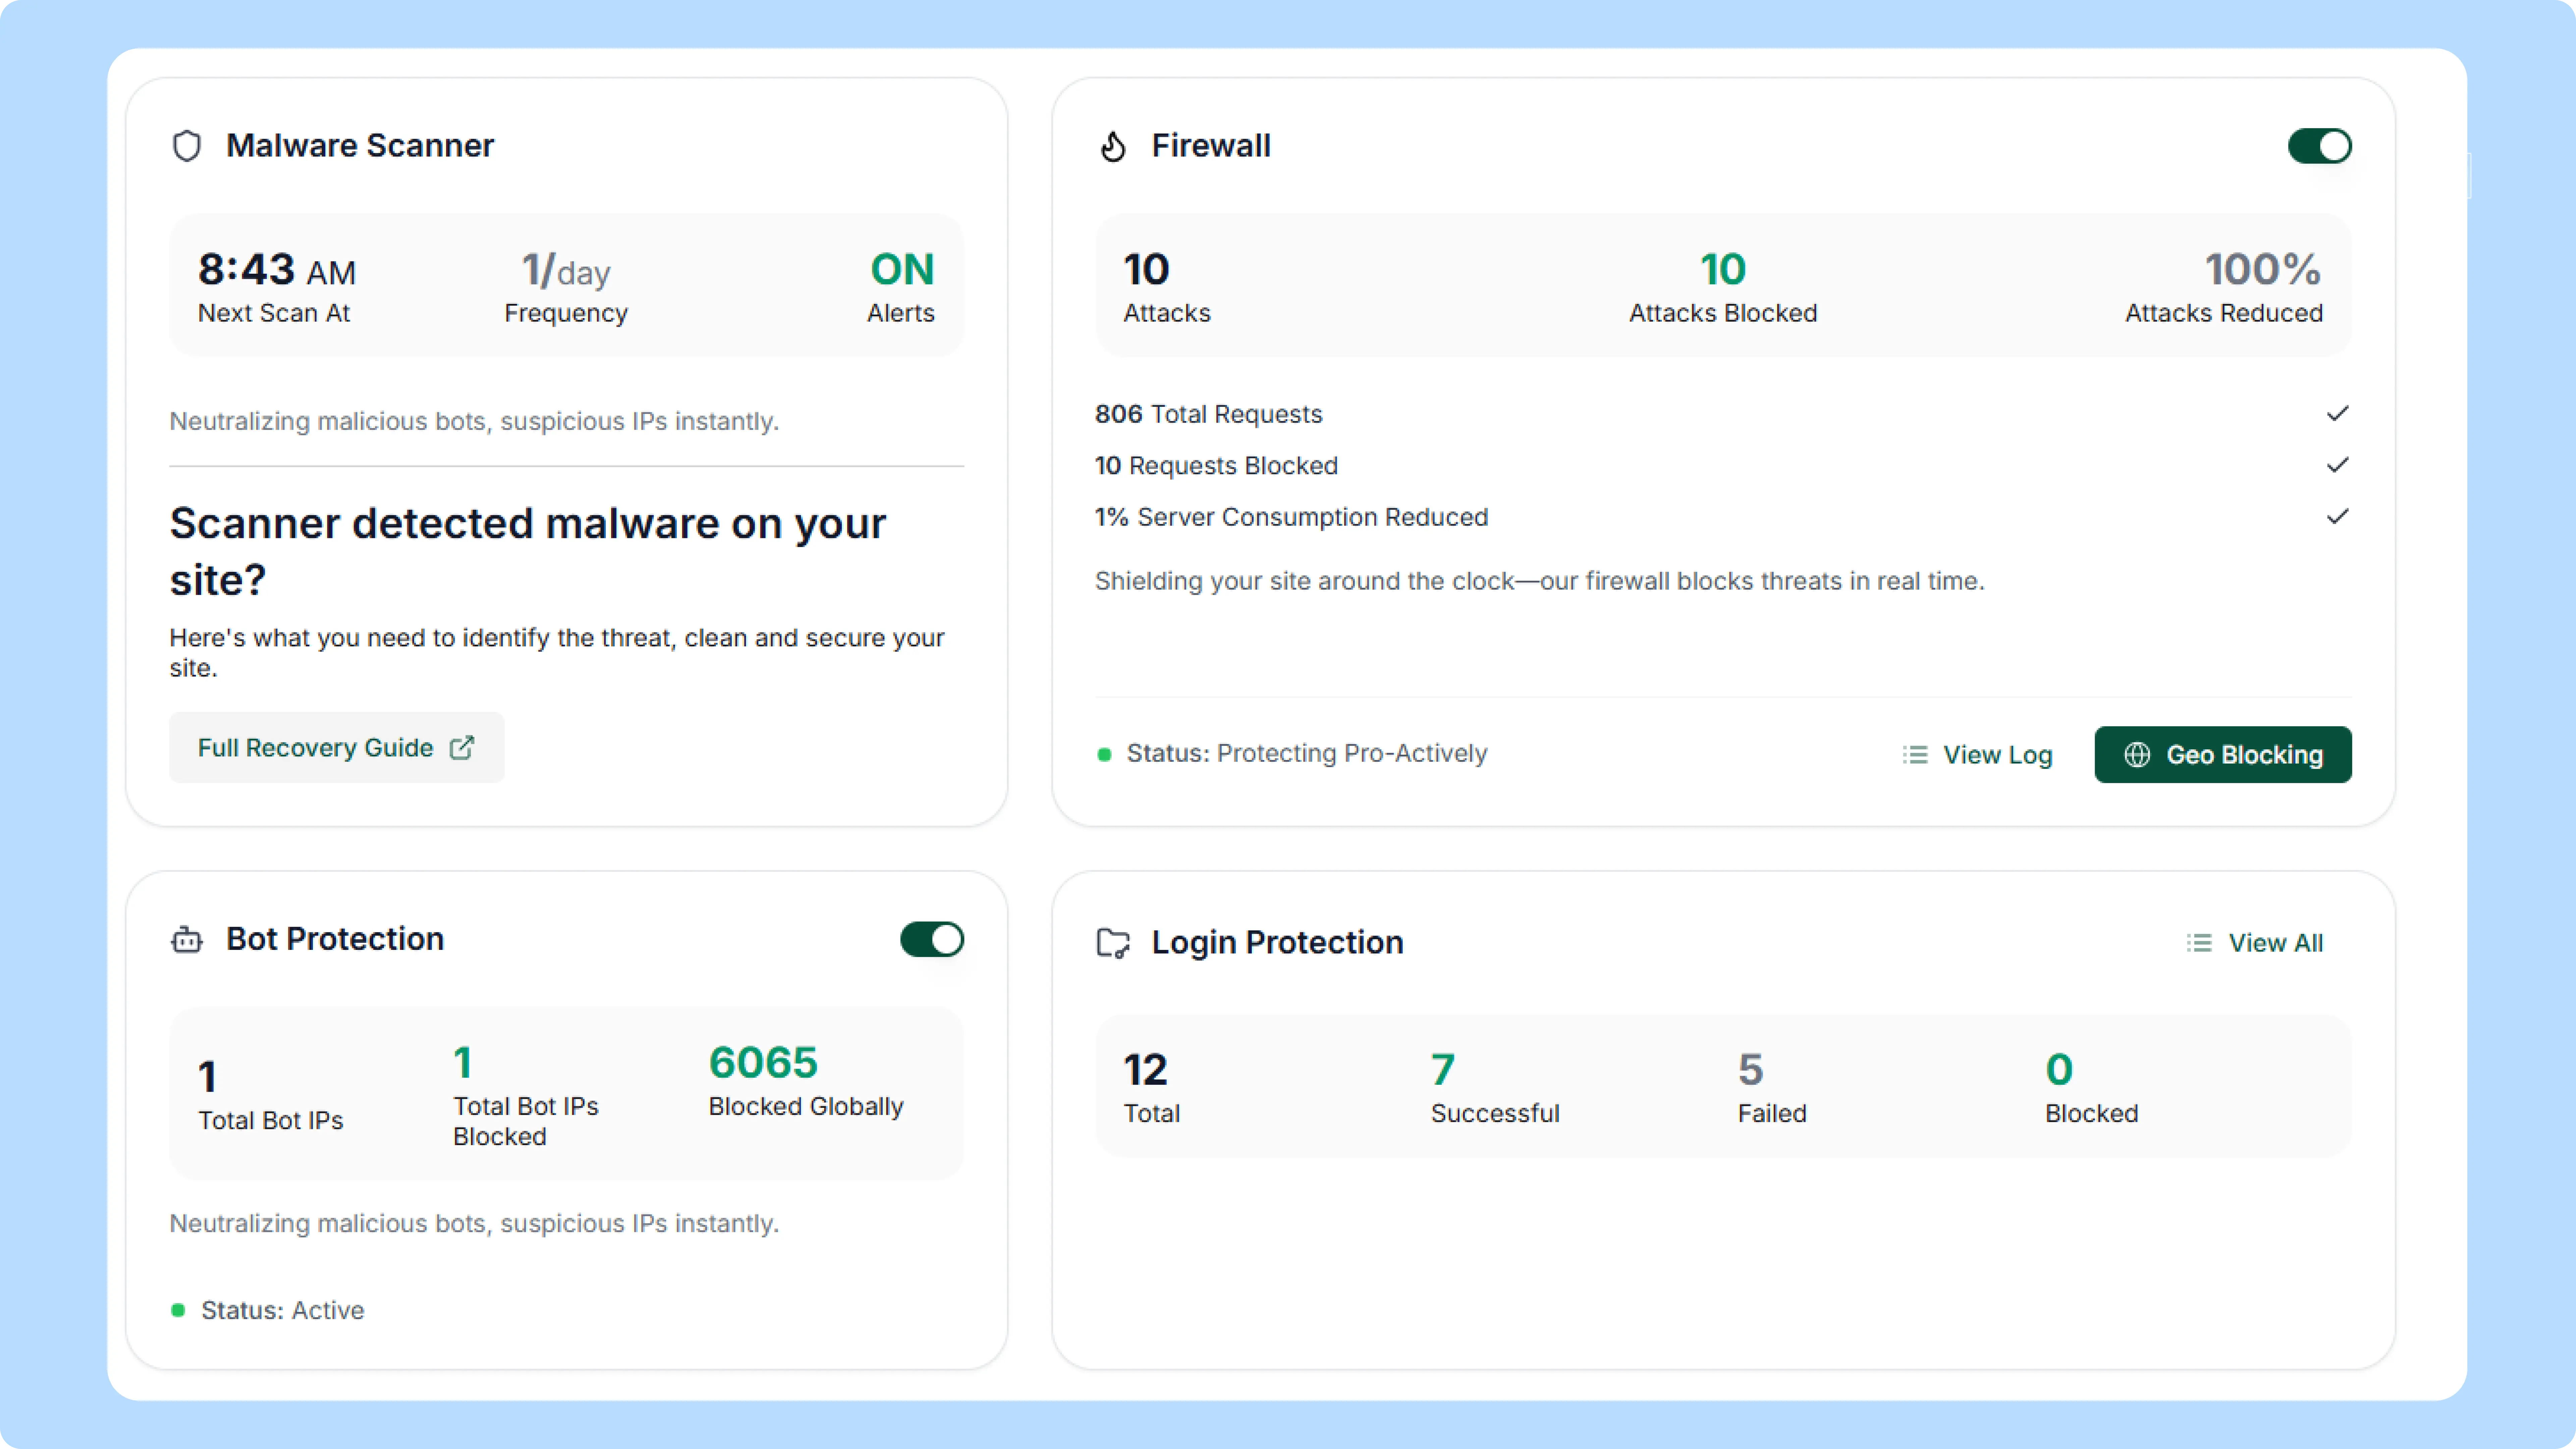
It isn't the only good option. Wordfence is popular and has a capable free scanner, and Sucuri is another well-regarded platform. Any of them can do this job. MalCare won on budget and ease of use for this client.
The setup is deceptively simple:
Install and activate the MalCare plugin on the site (Plugins → Add New, or upload the zip).
Connect the site to your MalCare dashboard, create an account and add the site. MalCare syncs a copy of your site to its own servers and scans it there, so the scan doesn't slow your hosting down.
Run the scan and let it finish.
In our case, MalCare flagged 7 infected files:
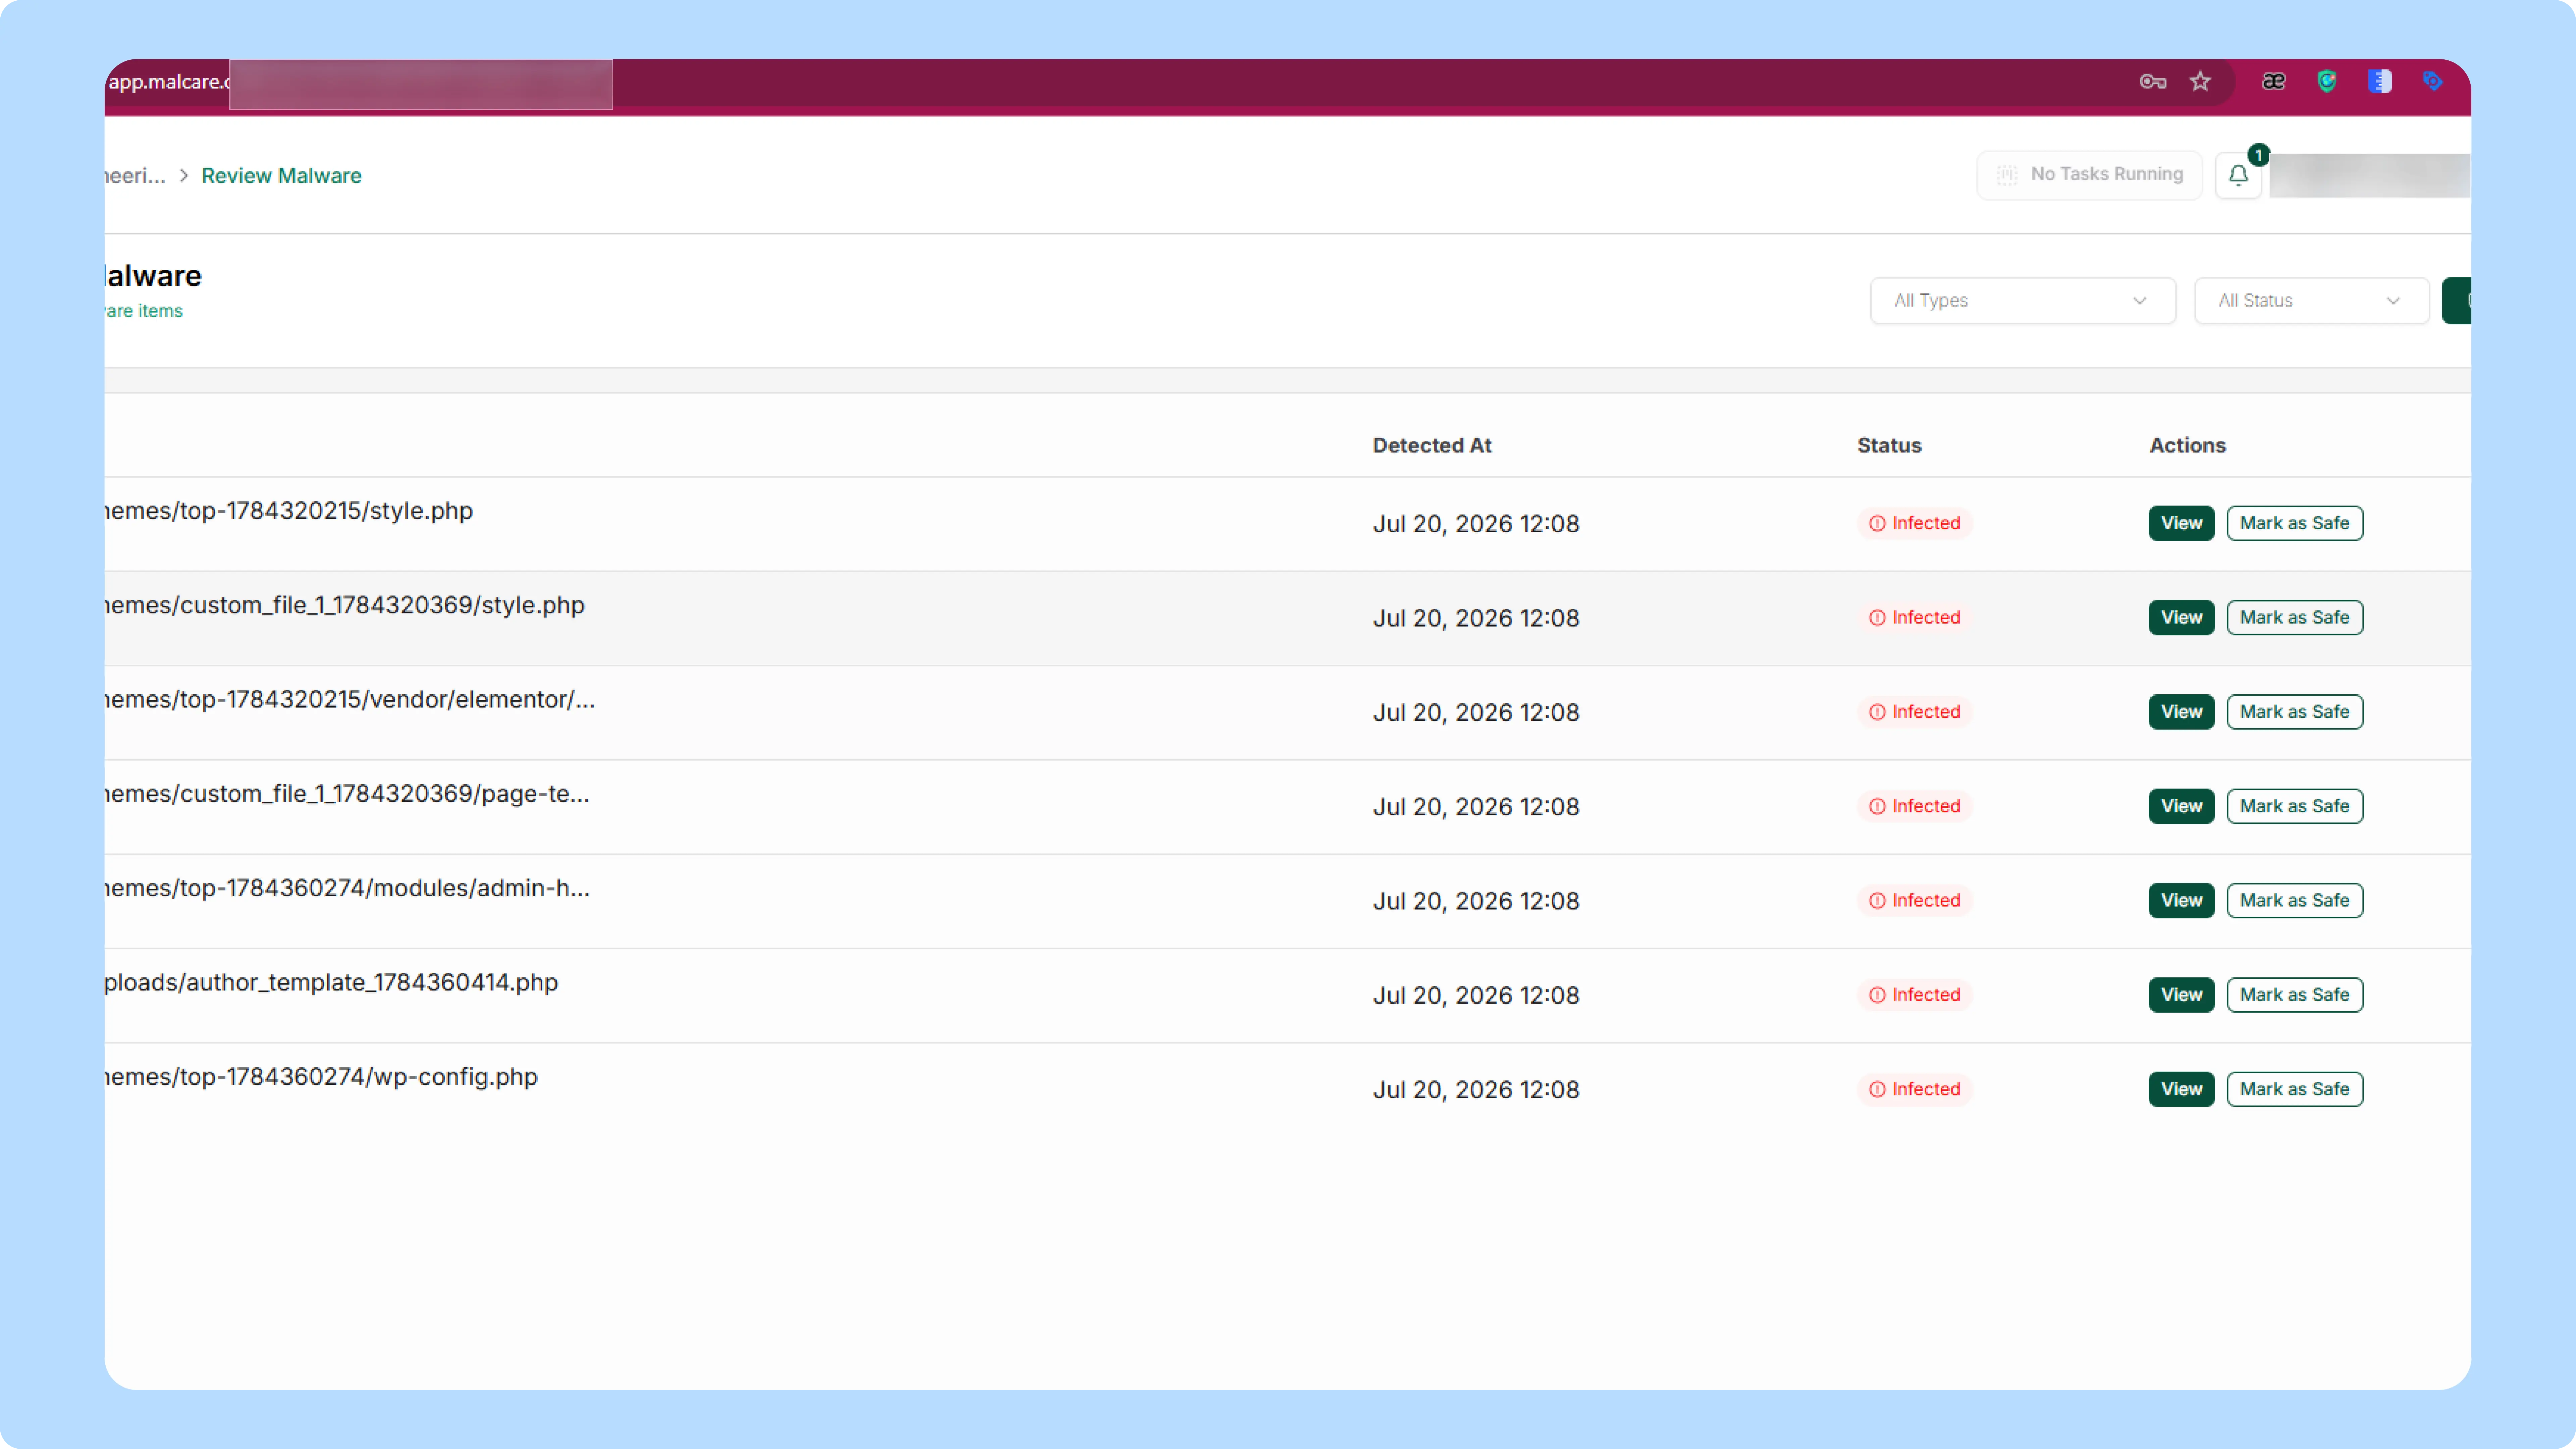
./wp-content/themes/top-1784320215/style.php
./wp-content/themes/custom_file_1_1784320369/style.php
./wp-content/themes/top-1784320215/vendor/elementor/…
./wp-content/themes/custom_file_1_1784320369/page-te…
./wp-content/themes/top-1784360274/modules/admin-h…
./wp-content/uploads/author_template_1784360414.php
./wp-content/themes/top-1784360274/wp-config.php
Review Results Before Cleaning
Here's where most guides tell you to hit clean and move on. Slow down. Where these files sit and what they're named tells a story. One worth reading before you delete anything.
Three "theme" folders you don't recognize — top-1784320215, custom_file_1_1784320369, top-1784360274. A real site only has the themes you installed (this one runs Astra). These aren't themes. They're folders an attacker dropped into your themes directory to look like themes, and the random-number names give them away. No developer ships a theme called top-1784320215.
A PHP file inside uploads/ — author_template_1784360414.php. The uploads folder is for media images, PDFs, that sort of thing. It should never contain a PHP file, and that folder is a classic backdoor hiding spot. (This is the file we flagged back in Step 2.)
A second wp-config.php inside a theme folder. Your real wp-config.php is a core file that lives in the site root, exactly once. A second one buried inside wp-content/themes/top-1784360274/ isn't a config file at all. It's camouflage, a malicious file wearing a trusted, boring name so your eye skips over it in a file list.
And those long numbers in the folder names? They aren't random. They're Unix timestamps, the standard way a computer stores a moment in time as a single number. Decode them and each one lands on a precise second in July 2026. What that timing reveals is the opening of Step 4. For now, the takeaway is simpler: every one of these files is in the wrong place, wearing a name no human would choose. That is what a planted infection looks like.
The one-click clean
MalCare offers a one-click clean that removes whatever it flagged. We ran it. It removed the files.
The site kept redirecting.
That scan wasn't a mistake. It's what most professionals would do first, and for the vast majority of infections it's the entire job. This one was the exception. The scanner found the files it could fingerprint and cleaned them, but the fake Cloudflare redirect came straight back. So whatever generated it either wasn't in those seven files, or something was quietly putting it back.
An automated scanner is excellent at matching known-bad files. It is not guaranteed to find a well-hidden backdoor, or an injected loader that keeps its real payload elsewhere and fetches it on demand. That's precisely what was happening here. We'll show you where the payload was hiding in Step 4.
So a clean scan report or even a successful auto-clean is not proof your site is clean. It's one data point. To actually trust it, you cross-check it. Which is where the second method comes in.
Method 2: Analyze with AI
A signature scanner asks one question “Does this file match known malware?”
AI can ask a better one for hidden threats “What is this code actually trying to do?”
That difference matters, because the nastiest WordPress malware is written specifically to not match signatures. It's obfuscated, encoded, reassembled character by character at runtime, or split across files that each look innocent alone. A scanner walks right past that. A model reading for intent catches it: the eval() of a base64 blob, the include pulling code from somewhere it shouldn't, the loader quietly reaching out for its real payload. That last one is exactly what kept our site redirecting after the plugin reported "clean."
And you already have the perfect thing to feed it: the lean, offline forensic copy from Step 2. Note what you're not doing: you're not handing an AI the keys to your live site. You're pointing it at a folder of code sitting on an isolated machine. That's exactly how this should work.
Use a File-Reading Tool
Pasting files into a chat window one at a time doesn't scale to a whole site, and it throws away the context of how files relate to each other. What you want instead is a command-line AI agent, one that can open your infected-copy/ folder, read through it recursively, run its own searches, and reason across the whole codebase at once.
At the time of writing, the usual picks are Claude Code (Anthropic) and Codex CLI (OpenAI). There are also model-agnostic tools: Command Code, Aider, OpenCode, that run whatever model you point them at. This corner of the world moves fast, so use whatever's current and whatever you know best. The method doesn't change.
Fair warning: this is the more technical route. If the command line isn't your world, there's no shame in stopping at the plugin scan or handing it to a pro. If you're comfortable in a terminal, it's a serious step up.
The setup
Put your forensic copy on the machine where you'll run the agent.
Open the agent inside that folder, cd into infected-copy/ and launch it there, so the folder becomes its working directory.
Give it the detection prompt below as its instructions.
Let it work through the files and produce its report.
Here's the prompt we use. Copy it as-is:
# WordPress Malware Detection & Cleanup Assistant

You are an experienced WordPress security engineer specializing in malware analysis and cleanup.

Your task is to inspect the current WordPress installation and identify malware, backdoors, web shells, SEO spam, hidden redirects, malicious JavaScript, and suspicious modifications.

Do not assume everything suspicious is malicious. Minimize false positives and explain your reasoning.

## Files to inspect

Recursively inspect:
- WordPress core
- Plugins
- Themes
- MU Plugins
- Drop-ins
- uploads/
- wp-config.php
- .htaccess
- JavaScript files
- CSS files
- Any SQL dump if available

## Detect

Search for:
- Web shells
- PHP backdoors
- Remote code execution payloads
- Hidden admin creation
- Obfuscated PHP
- Encoded payloads
- Hidden includes
- Malicious cron jobs
- SEO spam
- Gambling links
- Betting links
- Pharmacy spam
- Hidden backlinks
- Hidden iframes
- Redirect malware
- Fake plugins
- Fake themes
- Modified WordPress core files
- Unexpected PHP files inside uploads
- Suspicious JavaScript
- Credit card skimmers
- Cryptocurrency miners

## Look for common malware techniques

Analyze the intent of the code instead of searching only for dangerous functions.

Pay special attention to:
- eval()
- assert()
- system()
- exec()
- shell_exec()
- passthru()
- proc_open()
- popen()
- call_user_func()
- create_function()
- Reflection API
- base64_decode()
- gzinflate()
- gzdecode()
- str_rot13()
- hex2bin()
- pack()
- unpack()
- Variable functions
- Variable variables
- Dynamic includes
- Character-by-character string reconstruction
- XOR decoding
- Hidden payload loaders

Do not report these functions unless their usage is actually suspicious.

## Database inspection

If a SQL dump is available, inspect it.

Check:
- wp_posts
- wp_postmeta
- wp_options
- wp_users
- wp_usermeta
- Comments
- WooCommerce tables
- Custom tables

Look for:
- Injected JavaScript
- Hidden iframes
- Spam pages
- Gambling links
- Casino links
- Betting links
- Pharmacy spam
- SEO spam
- Hidden backlinks
- Redirects
- Suspicious serialized data

## Produce a report

For every finding provide:
- File or database table
- Line number if applicable
- Severity
- Confidence (0-100%)
- Why it is suspicious
- Whether it is confirmed malware or only suspicious

## Cleanup plan

For every confirmed finding recommend one of:
- Delete
- Replace with official WordPress file
- Replace plugin from official source
- Replace theme from official source
- Remove malicious database records
- Remove malicious cron job
- Remove injected JavaScript
- Remove spam content
- Manual review required

Explain why.

Never recommend deleting a file unless highly confident it is malicious.

## Final Summary

Produce a concise summary including:
- Number of infected files
- Number of suspicious files
- Database infections found
- High-risk issues
- Cleanup order
- Remaining manual checks

Think like an experienced WordPress malware analyst.
Prefer evidence over assumptions.
Reduce false positives.
Explain your reasoning.

Your goal is to help safely clean the infected WordPress site while preserving legitimate files and data.
Notice what this prompt deliberately does not do: it never says "flag anything containing eval()." It tells the model to judge intent, minimize false positives, rate its confidence, and explain its reasoning for every single finding. That discipline is the whole point. Every "dangerous" function on that list has legitimate uses, and a prompt that just greps for scary keywords will bury you in false alarms until you stop trusting it. This one asks for evidence.
Cross-Check With More Models
Here's the step that turns AI from helpful into trustworthy: run the same prompt against the same code with more than one model. No single model catches everything, and each one has different blind spots. Two easy ways to do it:
Run two vendor CLIs on the same folder with the same prompt on Claude Code, then Codex CLI, and compare the reports.
Or use a model-agnostic tool (Command Code, Aider, OpenCode) and switch the model between runs.
For that second or third pass, pick models of genuinely different lineage like Claude, GPT, and strong open models like DeepSeek, Kimi, or MiMo. Two models built along the same lines tend to miss the same things; two built differently tend to catch what the other drops. Two models built along the same lines tend to miss the same things; two built differently tend to catch what the other drops.
Then read the reports side by side:
A file both models independently flag, with high confidence and a clear explanation → treat it as a real finding.
A file only one model flags → not dismissed, but not deleted on faith either. It goes on the manual-review list.
Anything either model rates low-confidence → you look at it yourself before touching it.
This is how you surface a persistence mechanism a single scanner missed. And, just as importantly, how you avoid deleting a perfectly legitimate file because one model over-flagged it.
Two Rules Before Deleting Anything
Verify every finding yourself. AI can be confidently wrong in both directions, flagging clean code as malware, or reassuring you about something that's genuinely malicious. Open each flagged file, read what it's doing, and make sure you understand why it's malware before it goes. The AI's job is to narrow the search and explain the code. The decision stays yours.
Mind the secrets in wp-config.php. Your forensic copy includes wp-config.php, which holds your database credentials and security keys. Send that to a cloud model and those secrets go with it. You rotated them in Step 1, so they're already stale, but if it still makes you uneasy, blank the values out before analyzing, or run that one file through a local model (Ollama, LM Studio).
Between the plugin scan and two AI passes, you now have what you didn't at the start: a cross-checked list of every malicious file on the site, each with a reason attached, including the ones the scanner alone would have left behind.
Now we remove them properly, and finally answer the question hanging over this whole cleanup: what was actually generating that fake Cloudflare page, and why did it survive the first round?
That's Step 4.
Step 4: Remove the Malware and the Hidden Backdoor
Let's go back to where this section started. MalCare found seven files. We cleaned them, and the fake Cloudflare page came right back. Before we could remove the real problem, we had to understand what we were dealing with.
The files themselves had already told us more than we realized. Starting with their names.
What the Timestamps Reveal
Remember those odd folder names from the scan: top-1784320215, custom_file_1_1784320369, top-1784360274, and the uploads file author_template_1784360414.php? Those long numbers aren't random padding. They're Unix timestamps, and they decode to something more precise than a date: an exact second, lining up with when this attack ran.
You can check any of them yourself. On Linux or Mac, date -u -d @1784320215 turns the number back into a real timestamp. Any online Unix-timestamp converter does the same. Do that for all four, and a sequence falls out:
The first item appeared on Fri, Jul 17 at 20:30:15 UTC: themes/top-1784320215/.
2 minutes and 34 seconds later, themes/custom_file_1_1784320369/ appeared at 20:32:49 UTC.
On Sat, Jul 18 at 07:37:54 UTC, themes/top-1784360274/ appeared, 11 hours and 5 minutes after the previous item.
Finally, 2 minutes and 20 seconds later, at 07:40:14 UTC, uploads/author_template_1784360414.php appeared.
Read that sequence and two things jump out.
First, within each burst, files landed about 2.5 minutes apart. Nobody hand-builds fake multi-folder theme structures on a live server at 20:30, then again at 20:32, on a Friday night. That's not someone working, that's a script running.
Second, the two bursts are eleven hours apart. The attack didn't happen once. It ran Friday evening, then ran again Saturday morning. Which matches the symptom that started all this: the infection kept coming back. This was never a one-time break-in. It was automated, and it was built to repeat.
That single observation reframes the entire cleanup. We're not hunting one planted file to delete. We're hunting whatever let this run and re-run on its own: the mechanism MalCare's cleanup never touched, quietly rebuilding the damage each time.
That mechanism is a backdoor. But before we could hunt it down, we had to understand exactly what it was doing.
Why the Redirect Kept Coming Back
Deleting those seven files didn't stop the redirect for a simple reason: the redirect was never really in them. Two things kept it alive, and you need to understand both to remove either one.
The loader. The fake Cloudflare page isn't a page you land on. It's generated by a small piece of injected JavaScript, a loader, that the attacker slipped into the site. And a loader doesn't need to sit in an obvious malware file. It hides somewhere legitimate, a couple of lines added to header.php or footer.php, a quietly modified plugin file, even a row in the database. If that spot wasn't one of the files your scanner fingerprinted, cleaning the flagged files leaves the loader running, untouched.
The backdoor. Even if you find and delete the loader, something puts it back. That's the entire job of a backdoor “persistence”. It's a hidden PHP file, a web shell or an injector, that lets the attacker re-execute their code on demand. That's what the timestamps were showing: the attack firing again on its own, eleven hours later. Remove the visible payload but leave the backdoor, and it re-injects everything on the next pass.
So here's the trap in one line. A scanner cleans the symptoms, a backdoor regenerates them. That's why the honest goal of this step isn't "delete the bad files." It's "find and remove the loader and the thing feeding it."
What this Attack Actually Is
It's worth knowing what you're up against, because it explains why the usual "delete it and hope" approach fails so reliably here.
That fake "verify you are human" screen has a name. It's a ClickFix attack, and right now it's one of the most common things a hacked WordPress site gets quietly turned into. Security researchers first documented it at scale in 2024, and it's been refined ever since. The injected script shows visitors a convincing Cloudflare or CAPTCHA lookalike, then walks them through pasting a command into their own computer. That's how the visitor gets infected, even though the site is what was hacked.
What makes the current version so stubborn is where the real payload lives. In the campaigns Google's threat-intelligence team tracks, the JavaScript injected into your site is only a lightweight loader. The actual payload the code that decides what to show the visitor and what to steal. Sits somewhere you can't reach and can't take down: hidden on a public blockchain, using a technique researchers named EtherHiding. The loader simply fetches it on demand.
For anyone cleaning up, that design has two ugly consequences:
The attacker can swap the payload at will, without touching your site again. They update it at the source your site fetches whatever's current. A site can scan clean one day and serve something new the next.
There's nothing to report or shut down. The payload isn't on a server you can get suspended for. It's on a decentralized network that isn't going anywhere.
The good news: you don't have to untangle any of the blockchain side to fix your site. That's the attacker's infrastructure, not yours. But it's why you can't be casual here. The two things that do live on your site, the injected loader and the backdoor re-planting it, have to be found and removed completely, or the whole thing rebuilds itself.
That's what we did next.
Find the Backdoor in "view source"
Whatever was generating that redirect had to be living somewhere the scan never flagged. And the fastest way to find an injected script is to look at what the site actually sends a visitor's browser, the raw page source.
Except we couldn't. Right-click was disabled on the page, and so was Ctrl+U, the keyboard shortcut for "view source." That isn't a WordPress setting. That's the malware deliberately blocking the two easiest ways to inspect it. Which is basically a confession. A legitimate site never fights you for looking at its own source.
There's one way around it the malware can't block. Type the address yourself with view-source: in front of it:
view-source:https://yoursite.com/
The browser fetches the raw source directly, no right-click needed. And there it was an unfamiliar <script> block injected into the page that had no business being there. Following it back led straight to a plugin sitting in wp-content/plugins/ that nobody had ever installed — “xdav-tracker.”
Anatomy of the Backdoor
Here's what that plugin looked like (condensed slightly for readability; the real file is denser). It's worth walking through line by line, because nearly every one is a small lesson in how to stay hidden:
<?php
/**
 * Plugin Name:  XDav Tracker
 * Version:      2.4.7
 * Description:  provides support for basic computer vision algorithms and a range of tracking cameras.
 * Author:       XDav
 */
if ( ! defined( 'ABSPATH' ) ) { exit; }

// (1) Hide this plugin from the Plugins list
add_filter( 'all_plugins', function( $plugins ) {
    unset( $plugins[ plugin_basename( __FILE__ ) ] );
    return $plugins;
}, 42 );

function xdav_tracker() {
    // (2) Do nothing for admins or logged-in users
    if ( is_admin() || ( is_user_logged_in() && current_user_can('manage_options') ) ) {
        return;
    }
    ?>
    <script>
      /* (4) obfuscated payload: base64 -> XOR-decoded -> executed */
      !function(){ var _0xd6ec = atob('…long encoded blob…'); /* … */ (new Function(/* decoded code */))() }();
    </script>
    <?php
}
// (3) Inject on 'shutdown', after the page has finished rendering
add_action( 'shutdown', 'xdav_tracker', 42 );
Four tricks, stacked on top of each other:
It hides itself. That all_plugins filter quietly removes the plugin from your Plugins list. Log into WordPress, open Plugins → Installed Plugins, and it simply isn't there. As far as the dashboard is concerned, it doesn't exist. Which is exactly why no one ever spotted it.
It ignores you. The function bails out immediately for anyone who's an admin or logged in. So while you're working inside wp-admin, the site behaves perfectly. The malware only wakes up for logged-out visitors, the people you never see. This is why the dashboard looked spotless, and why we had to view the site as a plain visitor to catch it at all.
It fires late. Hooking into shutdown injects the script at the very end of the page lifecycle, after WordPress has finished its normal work. Timing that helps it slip past tools inspecting earlier stages.
It's obfuscated. The real payload is a base64 blob, XOR-decoded and then run through new Function() JavaScript's version of eval(). Encoded that way, it's meaningless to a human skimming the file and to any scanner matching known-bad text. There's no readable "redirect" or "cloudflare" in there to flag. You have to decode it to see what it does.
And that description "computer vision algorithms and tracking cameras" is pure camouflage. A plausible-sounding technical sentence chosen so your eyes slide right past it. There is no such WordPress feature.
What the Payload Actually Did
So we decoded it. What came out was a textbook case of the technique we just walked through “EtherHiding” caught live on our client's site.
Stripped of its obfuscation, the script does four things:
It carries a hardcoded list of 14 public Polygon blockchain nodes and a single smart-contract address (0xB6bC9e1D0b2fB96Ab7C47E04Cb0BE477410bC1f2).
On every visitor's page, it quietly calls that smart contract. Trying each blockchain node in turn until one answers and reads a value back out of it.
That value decodes to a URL.
It then injects a second <script> from that URL (something like …/api.php?s=…) and that second script is what builds the fake Cloudflare page and drives the redirect.
Read that back, and you can finally see why deleting files never worked. The redirect was never stored on the site at all. The site only ever held a tiny loader whose entire job was to ask a blockchain where today's payload lives, and go fetch it. It's the resilience we walked through a moment ago, now caught in the actual code: on your side, there's nothing to remove but the loader itself.
That's the whole reason it survives an ordinary cleanup. And it's why the only thing that actually fixes it is removing the loader, the xdav-tracker plugin completely. Which is exactly what we did next.
Remove It and Lock It Down
Removing xdav-tracker is where the redirect finally dies. But there's a catch: you can't delete it from the WordPress dashboard. It erased itself from the Plugins list, remember. So there's no "Deactivate" or "Delete" link to click. As far as WordPress is concerned, the plugin isn't installed.
So you delete it at the file level instead. Open your hosting File Manager or connect over SFTP, go to wp-content/plugins/, and delete the xdav-tracker folder outright. The instant it's gone, the loader has nothing left to run. For us, the fake Cloudflare page vanished on the very next visit. Everything just… stopped.
Then finish the job on the files from Step 3: the fake theme folders, the stray PHP file in uploads/, the bogus wp-config.php buried in a theme folder. All seven were part of the same infection. Delete them, and between those and the hidden plugin, you've removed what the scanner caught and what it missed.
Now re-scan. Run MalCare again (and the AI pass, if you used it) to confirm nothing malicious is left. And, just as importantly, that nothing is quietly regenerating. A clean second scan is what you want to see before you start trusting the site again.
Rotate Credentials Again
Here's a subtlety worth getting right. Back in Step 1, you rotated your credentials to slam the obvious doors shut. Do it again now. This is the rotation that really matters, because this time there's no backdoor sitting on the site watching you set the new ones.
While the backdoor was live, any password you changed could, in principle, be read straight back by the attacker through it. With xdav-tracker gone, that's no longer true. So now:
Rotate them all once more: WordPress admin, hosting control panel, database user, FTP/SFTP.
Then regenerate your WordPress security salts, the secret keys in wp-config.php. This does something a password change can't. It invalidates every active login session at once. If the attacker was still holding a valid session cookie, fresh salts log them out instantly.
WordPress publishes an official generator at https://api.wordpress.org/secret-key/1.1/salt/. Open it, copy the set it gives you, and paste it into wp-config.php over the old keys. Every refresh produces a brand-new set.
That combination backdoor gone, every credential fresh, every old session killed is what actually severs the attacker's access. Instead of just tidying up what they left behind.
Run One Last Check and Keep Monitoring
One immediate check view the site as a logged-out visitor on desktop, the only visitors the malware ever targeted. For us, the fake page was gone.
Then don't walk away just yet. This attack ran itself twice, so one clean look isn't proof. Give it a few days: no returning fake page, no new spam, scans staying clean. That's how you confirm you removed the whole thing, not just the part you could see.
As for how they got in to begin with. That's the honest hard part, and we close the entry point in Step 6. But first, there's the mess the attacker left behind in your database.
Step 5: Clean the Database
The files are clean. But an infection has a second place to hide, and it behaves differently there: your database.
Malware in the database usually isn't a script waiting to run. It's one of two things: content the attacker wants (spam posts, hidden links), or access the attacker wants to keep (rogue admin accounts). You have to check for both. Here's what this site's database was carrying, table by table.
How to look. Export the database first. That's your safety copy. Then open it in phpMyAdmin, which Hostinger includes, or in Adminer. If you'd rather let AI do the first pass, feed that .sql export to the same detection prompt from Step 3. It inspects database tables too. Either way, you're looking at four things: the posts, the users, the options, and the scheduled tasks.
The Spam Posts
The casino posts our client saw on the front end live in wp_posts. There were dozens: Czech, Italian, and a long run in Azerbaijani, all pushing the same "Mostbet" casino and Aviator content. That's the point of the spam: the attacker borrows your site's search authority to rank for gambling terms, turning your domain into a billboard for their operation.
To find them, search wp_posts for the spam terms and check each match's post_author, post_date, post_status, and post_type. Then delete them for good, not to Trash actually delete. And clear the wp_postmeta rows tied to those post IDs so no orphaned metadata is left behind. The WooCommerce catalog here was untouched, all 229 products intact. The attacker only added posts, which made removing them clean and safe (in my client's case).
Rogue Admin Accounts
The WordPress Users page showed a single account, the real one. But wp_users and wp_usermeta told two different stories. wp_users held only that one legitimate account. wp_usermeta still carried administrator-level capability records for five more user IDs, under names no legitimate site would use:
adminbackup (twice)
wp-manager
wadminw
sys_c0146c40
Those are textbook attacker account names. Their metadata showed real activity profile updates, WooCommerce sessions dating back to around March 2025. More than a year before the fake-Cloudflare attack, someone had already held full administrator accounts on this site. The breach was older and deeper than the file backdoor alone suggested.
So why didn't the Users page show them? Because the accounts had already been deleted from wp_users at some earlier point, while their admin capabilities stayed behind in wp_usermeta. The Users page reads wp_users. It can't show you permission records whose accounts no longer exist. Those orphaned capabilities just sit there, invisible from the dashboard quiet proof that admin access had been handed out before, and ready to hand it back if a matching account were ever recreated.
The only way to catch this is to look at wp_usermeta directly. Query it for meta_key = 'wp_capabilities', read every user_id it returns, and cross-reference each against the real accounts in wp_users. Anything left over a capability record for a user that no longer exists, or any admin you don't recognize- gets removed. Delete those orphaned rows. And if a check ever turns up a live rogue account still sitting in wp_users, delete the user itself and reassign its content to a real one.
Check the Rest Carefully not to break your site
The rest of the database was clean, but each part is worth verifying, because these are the usual hiding spots:
siteurl and home: both still pointed at the real domain. Malware often rewrites these to force a redirect, so it's the first pair to check. Clean here.
Application passwords none. These are app-specific credentials that can act as a quiet REST-API backdoor, so we checked wp_usermeta for them. There were none.
Scheduled tasks (cron): every job was a legitimate one from a real plugin (WooCommerce, Elementor, Rank Math, and so on). There were a couple of leftover entries from plugins that had been uninstalled (Jetpack, Popup Maker), harmless orphans, not malware. WordPress just doesn't sweep those up on its own.
That last point leads to the trap you have to watch for down here: the database is full of things that look alarming but aren't. A keyword search on this site turned up <script> tags. Elementor stores page-builder data, and it's full of them. It turned up <iframe>s: a YouTube embed, a cached news feed, the contact page's map. It even turned up the word "polygon," which had nothing to do with the blockchain from Step 4 and everything to do with an Elementor shape divider. Delete any of those and you'd break the site.
This is exactly why the detection prompt back in Step 3 keeps insisting on judging intent and minimizing false positives. In the database especially, legitimate content and injected content can look identical at a glance. So you confirm what a thing actually does before you remove it.
With the spam posts gone, the orphaned admin capabilities cleared, and the rest verified, the infection is finally out from files and database both. What's left is making sure none of it can come back, closing the door the attacker used, and hardening everything around it. That's Step 6.
Step 6: Harden the Site so It Can't Happen Again
Removing an infection gets you back to zero. Hardening is what keeps you there.
This is also where you finally face the uncomfortable question from Step 4: “How did they get in?” When you can't point to one clear entry point (and honestly, you usually can't), the right answer is to close every likely door at once. Here the breach clearly ran deep, back to those March-2025 admin accounts. So we stopped hunting for a single hole and treated the whole site as long-compromised, locking it down top to bottom.
Here's the checklist we worked through, grouped by what each part actually protects.
Lock Down the Accounts
You already did the core of this in Step 4: every password rotated, and the WordPress salts regenerated to kill any lingering sessions. Two things finish it off.
First, fix the admin email. This site's only admin account was tied to admin@xyz.com, a placeholder that was never a real, monitored mailbox. That's a problem on its own: password resets and security alerts land in an inbox nobody reads. Point it at an address the owner actually checks. And if a whole team has been sharing one admin login, as this owner had been, give each person their own account access you can trace and revoke individually.
Second, turn on two-factor authentication. Here it was available but switched off. The dashboard read one user, two-factor setup pending. With this site under a steady stream of brute-force login attempts, it's the highest-value toggle on the page. Turn it on and a stolen or guessed password stops being enough. The attacker needs the code on your phone too. Enable it on every admin account.
Shrink the Attack Surface
Every feature a site exposes is a door someone can rattle, and most sites leave doors open they never use. Close them.
Change your login URL. By default, every WordPress login sits at /wp-admin and /wp-login.php addresses every scanning bot already knows. This site's login logs were a wall of failed attempts against the admin username, from Argentina, Brazil, Japan, Italy, and a dozen other countries: a textbook distributed brute-force, grinding away in the background. Move the login page to a custom path, and it drops off those bots' map entirely.
Limit login attempts. Pair that custom URL with a lockout rule: after a handful of failed tries from one IP, block it. Between the two, there's nothing left for the brute-force wall to knock on.
Disable XML-RPC: unless you genuinely use it. It's an older WordPress interface that a few tools still lean on: the mobile app, Jetpack, some publishing integrations. Most sites, this one included, don't need it, and left on, it's a long-time favorite for brute-force and amplification attacks. If nothing you rely on depends on it, switch it off.
Disable application passwords. These are app-specific credentials for the REST API. We confirmed in Step 5 that none existed. So turn the feature off entirely, and none can be quietly created as a backdoor later.
Remove risky and unused plugins. Two earned removal on their own merits here. String Locator lets someone edit your theme and plugin files straight from the admin panel, a gift to anyone who gets in. SVG Support permits SVG uploads, a file type that can carry executable scripts. Beyond those, anything you're not actively using should go. Every plugin you keep is one more thing to defend.
Keep a firewall in front of the site. A web application firewall (WAF) filters malicious requests before they ever reach WordPress. Throughout this incident, the one on this site was visibly earning its keep, with a couple hundred active rules blocking bad bots and attack attempts around the clock while we cleaned. Whether it's MalCare's, Cloudflare's, or another, a firewall turns most of these attacks into non-events.
That seals the account and access side. Next comes the part that most often closes the actual vulnerability: getting everything up to date, carefully, along with locking down the files themselves.
Update Everything Carefully
This is the group that most often closes the actual hole. Most WordPress sites are broken into through a known vulnerability in an outdated plugin, theme, or core version something with a public fix the site never installed. This one ran on an agency template shared across a hundred-plus other sites, any of which could carry the same weak component. Updating everything wasn't optional.
So update WordPress core, every plugin, every theme, and the PHP version the site runs on to their current supported releases. On Hostinger, the PHP version is a dropdown in the control panel; the rest live in the WordPress dashboard.
But, and this is the part people rush and then regret, updates can break a live site. A plugin update can clash with your theme. A PHP jump can knock an older plugin offline. Do it with a net:
Take a fresh backup first a genuinely clean one this time, now that the site actually is clean.
If your host offers a staging environment, update there first and confirm everything still works before pushing to live. Hostinger provides one.
Update in small steps instead of hitting "update all" and hoping a few plugins at a time, checking the site after each round, so if something breaks you know exactly what caused it.
Prioritize anything marked as a security release.
One host-specific note: Hostinger runs its own update-management layer, which changes how and when core auto-updates actually fire. So "I'll just let it auto-update" isn't a safe assumption here confirm updates are actually being applied.
Harden the Files
A handful of file-level settings close the exact doors the attacker used to drop files in the first place.
Set correct file permissions. As a baseline: folders 755, files 644, and wp-config.php even tighter still at 640 or 600. The one value you never want to see is 777. It means anyone can write to that file or folder, which is precisely how malicious files get planted.
Turn off the built-in file editor. WordPress ships with an editor that lets an admin rewrite theme and plugin code straight from the dashboard wonderful for an attacker who gets in, unnecessary for nearly everyone else. Add define('DISALLOW_FILE_EDIT', true); to wp-config.php to switch it off. (Same risk as the String Locator plugin you removed earlier; this closes the version baked into WordPress itself.)
Protect wp-config.php. It holds your database credentials and salts, so it earns the tightest treatment: restrictive permissions, as above, and contents that never go anywhere public no screenshots, no support tickets, no shared folders.
Reinstall WordPress core. As a final guarantee that no core file is quietly modified, reinstall WordPress from the dashboard (Updates → Reinstall). It overwrites every core file with a known-good copy without touching your content, so anything an attacker altered inside core gets wiped out.
Keep Monitoring
Hardening isn't a thing you finish once and forget. Leave monitoring running:
Keep a security plugin scanning on a schedule with alerts on, so the next problem reaches you instead of a visitor.
Watching the firewall and login logs for a sudden shift in the pattern is an early warning worth having.
Check Google Search Console's Security Issues section, so if Google ever flags the site, you hear it straight away. (More on Search Console in Step 8.)
Pay closer attention for the first few weeks in particular. A clean scan today is reassuring, but a clean scan every day for a month is proof.
With the site hardened: accounts locked, surface shrunk, everything patched, files buttoned up, and monitoring live, the attacker's foothold is gone, and the obvious ways back in are shut. Now it's safe to bring the site back to the world. That's Step 7.
Step 7: Bring the Site Back and Verify It's Clean
The site's been sitting behind a maintenance page since Step 1. Now you bring it back, but not before one last round of checks, and one step almost everyone forgets.
Undo the lockdown first. Whatever you did in Step 1 to take the live site out of reach, reverse it now: repoint the DNS, drop the holding page, and let the domain resolve to the real, cleaned site again.
Then purge every cache, before you trust anything you see. A cache's whole job is to save a copy of your pages and serve that copy fast. This site runs LiteSpeed Cache, which means it may still be holding pages from while they were infected with injected scripts and all. You can clean the files and database perfectly, but if a stale cached page is what gets served, the visitor still gets the old, poisoned one. So purge the full page cache "Purge All" in LiteSpeed and clear any CDN or Cloudflare edge cache in front of the site too. Only once every cache is flushed are you looking at the live site rather than a snapshot of the infected one.
Now verify it the way the malware saw its victims. This is where the earlier detective work pays off. Remember how the backdoor behaved. It only fired for logged-out visitors, on desktop. So the wrong test will lie to you. Check the site while logged in as admin, or only on your phone, and it'll look flawless, exactly as it did all through the infection. Test it the way a real victim would have hit it: logged out, on desktop, from a browser you aren't signed into. Then run through the rest:
The visitor view is clean. No fake Cloudflare page, no redirect, nothing unexpected on desktop and mobile both.
A fresh full scan comes back with clean files and database both.
The site still works. Walk it like a user: the homepage, a few product pages, the contact form, and since this is a WooCommerce store, the cart and checkout. The cleanup and the updates in Step 6 could each have broken something; this is where you catch it.
The spam is gone and staying gone. No casino posts, nothing quietly regenerating.
Then watch the first few days closely. One clean look isn't the finish line. Going live can stir things back up, so keep an eye on your scans, the spam, and the logs. If it stays quiet, the cleanup held.
The site is clean, hardened, and live again. But there's one more casualty to account for: the damage the attack did to the site's standing with Google while it was compromised. Recovering that is the final step.
Step 8: Recover your SEO
The infection is gone, but it left a mark that was never on your server at all on your standing with Google.
While the site was compromised, it was doing two things Google specifically notices and punishes: publishing gambling spam, and redirecting visitors to a fake verification page. Left unaddressed, that means lost rankings and a "this site may be hacked" label stuck under your listing, sometimes a full browser warning that turns visitors away before they ever reach you. Cleaning the site stopped the damage. This step repairs the part most cleanup guides skip, even though for a business it's often the costliest part of the whole incident.
First, find out what Google actually saw. Open Google Search Console and check two places. The Security Issues report tells you whether Google detected hacked content. Manual Actions shows anything a human reviewer flagged. If both are clear, there's a good chance you caught the infection before Google did, which is what happened here, with the domain cleaned before it was ever blacklisted. If there is a flag, you now know exactly what needs clearing.
De-index the spam. The casino posts you removed in Step 5 now return "not found," which is correct, but Google may still be holding them in its index from when they were live. Two things speed their removal. Use Search Console's Removals tool to request the spam URLs be dropped, and make sure those deleted posts return a proper 404 or 410 so Google drops them permanently. The goal is simple: get the gambling pages out of your search results before anyone clicks one.
Request a review if you were flagged. If Security Issues or Manual Actions showed a problem, then once the site is genuinely clean, request a review right there in Search Console and describe what you cleaned. Google re-crawls, confirms the site is clean, and lifts the warning. This is the step that actually removes the "this site may be hacked" line from your listings, so it's worth doing promptly and honestly.
Re-crawl the clean site. Resubmit your sitemap so Google has the current, clean list of pages. Then use the URL Inspection tool to request indexing on your important pages, nudging Google to re-crawl the cleaned versions rather than whatever it last had on file.
Then watch the recovery. Rankings generally come back once a site is clean and re-crawled, but it's gradual, not overnight. Keep an eye on the Performance report in Search Console over the following weeks: impressions, clicks, average position. A steady climb back toward normal means the recovery is working. And if you'd had a security flag, the warning should disappear from your listings within days of the review passing.
That's the full recovery: the site clean, hardened, back online, and its search standing on the mend. Which leaves just one thing worth doing stepping back and pulling out what this whole episode has to teach.
Lessons We Took Away From This
A few things this cleanup drove home, most of them technical, one a little humbling.
A scanner saying "clean" is not the same as clean. The plugin found seven files, removed them, and the site kept right on redirecting. The thing actually doing the damage was hidden exactly where an automated scan doesn't look. If you take one idea from all of this: removing the malware you can see is not the same as removing the infection.
The dangerous part hides from the people looking for it. The backdoor skipped admins entirely and only ran for logged-out visitors, so the dashboard looked spotless the whole time. The only way to catch it was to view the site the way an attacker aimed it logged out, from the outside. Check what a real visitor gets, not what your admin panel shows you.
It was older and deeper than it first looked. The redirect was a July problem, but the database still carried rogue admin accounts active since March. Assume a compromise reaches further than the symptom in front of you, and check accordingly: files, database, and access, not just the one thing that's obviously broken.
Modern malware is built to survive a lazy cleanup. This one didn't even keep its payload on the site. It fetched it from a blockchain on every page load, so it could be swapped out remotely and never taken down. "Delete the file and hope" was never going to work here. Closing the loader and the way in did.
And the humbling one. The first quote for this job was around a couple of hundred dollars, before plugin licenses and other costs. Then came the hours of investigation, a hidden backdoor decoded line by line, a database combed table by table, a full hardening pass, and an SEO recovery. That number looked pretty optimistic by the end.
That's the honest lesson sitting underneath the technical ones: this work is almost always bigger than it looks from the outside. "Just clean the spam" turns into files, database, and access on three separate fronts. Whether you're quoting this kind of job or paying for it, price the investigation, not just the delete key.
Your WordPress Security Checklist
Keep this somewhere handy. It's the whole process, condensed to the essentials.
Contain
Take the live site out of reach (repoint DNS or serve a static holding page); maintenance mode isn't enough
Take a full backup, and label it clearly as the infected copy
Rotate every credential: WordPress, hosting, database, FTP
Find and remove
Scan with a security plugin, and cross-check with AI on an offline copy of the code
View the site's source as a logged-out visitor (view-source:) to catch injected scripts
Delete malicious files, fake theme folders, stray PHP in uploads/, hidden plugins
Clean the database: spam posts, rogue and orphaned admin capabilities, siteurl/home, cron
Regenerate your WordPress salts to kill every active session
Harden
Turn on two-factor authentication for every admin
Fix the admin email; give each person their own login
Change the login URL and limit failed login attempts
Disable XML-RPC and application passwords if you don't use them
Remove risky and unused plugins (file editors, SVG upload, anything idle)
Keep a firewall (WAF) in front of the site
Update core, plugins, themes, and PHP. Back up and stage first
Set correct file permissions, add DISALLOW_FILE_EDIT, and protect wp-config.php
Reinstall WordPress core for guaranteed-clean core files
Recover and watch
Purge every cache, including any CDN
Verify the site as a logged-out visitor on desktop
In Search Console: check Security Issues and Manual Actions
De-index the spam URLs, and request a review if you were flagged
Resubmit your sitemap and request indexing on key pages
Keep scanning and monitoring for several weeks
Need a Hand?
If any of this feels out of your depth, that's a fair place to be. A full cleanup is specialist work, and doing it halfway can quietly leave the door open for next time. AppDeel's WordPress security team does exactly this: auditing sites, removing malware and hidden backdoors, hardening against the next attempt, and recovering the rankings afterward. If you'd rather hand it off than spend your week living in view-source, that's what we're here for.